Tuesday, February 25, 2014

Forever Friends Gardener's Birthday Card


I haven't had time to do any card making for ages - getting on for a year I think! Since I had some time off between jobs I decided I would definitely make some time for this hobby. I made quite a few cards; some of them were pretty simple and quick such as this one.


I took a square white card blank and covered it with a piece of paper from a pack aimed at men - it included football print papers for instance but also some more generic patterns like this one. I had a pack of Forever Friends stickers on a gardening theme so I arranged some of these on the card, along with a few flower stickers from another pack as I felt it needed something to contrast. The banner is a die cut card that I bought in a pack of card making supplies from Ebay a long time ago, with a silver happy birthday outline sticker.

Monday, February 24, 2014

Meal Planning 2014 - Week 9


I'm starting my new job this week and don't know exactly what time I will be home in the evenings, but I know it will be later than in my last job and probably later than my boyfriend most days (though I will still be the one cooking dinner!). So I need some quick and easy recipes this week while I figure out my new routine.


Monday

Breakfast yogurt


Lunch will buy something out to explore the area near my new office


Dinner pork ragu with pasta


Tuesday

Breakfast yogurt or cereal


Lunch leftover pork ragu if there is a microwave in my new office, sandwich if not


Dinner out


Wednesday

Breakfast yogurt or cereal


Lunch sandwich


Dinner Fish in breadcrumbs/ chicken in breadcrumbs and chips


Thursday

Breakfast yogurt or cereal


Lunch sandwich


Dinner salmon and hollandaise sauce


Friday

Breakfast yogurt or cereal


Lunch sandwich


Dinner sausage and mash


Saturday

Breakfast yogurt or cereal


Lunch baked potatoes


Dinner homemade lasagne


Sunday

Breakfast yogurt or cereal


Lunch soup with fresh bread


Dinner roast chicken


Saturday, February 15, 2014

Valentine's card for my boyfriend

This is the Valentine's card I made for my boyfriend last year - I just realised I never actually posted it on my blog!


I took a square card blank and covered it with a red lovebird-patterned paper. I cut out a cardboard square from the same pack (which came with a cardmaking magazine) of two birds in cages and used a silver outline sticker around the edge. I mounted the square onto the card and added a 'For my Valentine' outline sticker - you can only just see it in this photo as it's red, but you can see it better on the actual card.


Wednesday, February 12, 2014

Chicken Provencale in a Heart-Shaped Le Creuset Dish


This is a great recipe to make for Valentine's day and it looks even better in a Le Creuset heart-shaped dish!


The recipe is adapted from one in a free calendar that came with Slimming World magazine at the end of last year. I bought this casserole dish from the Le Creuset shop at Bicester Village, the designer outlet shopping village, when I went in January. I came home with quite a few shopping bags that day! I'd had my eye on this casserole for a while and when I saw it was reduced from £45 to £27, I couldn't resist. Now all I need to do is find space for it in my kitchen cupboard....


For this Provencale chicken casserole, to serve two you need:

2 chicken legs (here I've actually used one leg and two small breast portions)

400g tin tomatoes

1 courgette, thinly sliced - though as neither of us likes courgette, I pureed it so I could stir it in without it being noticed

1/2 red onion, sliced

1/2 red pepper, diced

1 clove garlic, crushed

2 tsp dried herbes de Provence

salt, pepper

2 tbsp tomato puree

100ml chicken stock


Preheat oven to 180C. Spray a frying pan with Fry Light, season the chicken and fry the chicken for a couple of minutes on each side. Then transfer to the casserole dish.


Scatter the pepper, courgette and onions over the chicken.


Add the tinned tomatoes, tomato puree, chicken stock and garlic. Sprinkle the herbes de Provence over the top.


Put the lid on the casserole dish and bake in the oven for about an hour until the chicken is cooked.


The cooked dish....


Serve with a few spoonfuls of the liquid and the slow-cooked vegetables on top. And if your other half really loves you, they will do the washing up!


I'm sending this to Cooking with Herbs, hosted by Karen at Lavender and Lovage; she has a dual theme this month of Chinese new year and romantic recipes for Valentine's day.


I'm also sharing this with Four Seasons Food, hosted by Anneli at Delicieux and Louisa at Eat Your Veg. The theme this month is "food from the heart".


Tuesday, February 11, 2014

Mini Treacle Tarts


These may not look like much, but according to my boyfriend they taste delicious!


I wanted a bite-sized dessert option that wouldn't take too long to make so these were ideal. I found the recipe on the internet but adapted it as rather than weigh out quantities I played it by ear. I used Jus-Rol shortcrust pastry though if you want you can make your own.


Roll out the pastry and cut out circles. Spray a baking tin with Cake Release - you can use a mini tart tin, or a shallow cupcake tin, but here I found another use for the whoopie pie tin I was given a couple of years ago.


Add about 1 tbsp of fresh white breadcrumbs onto the centre of each pastry case and spread out evenly.


Drizzle 1 heaped tsp of golden syrup over the top and allow to soak in.


Bake in a preheated oven at 180C for 15-20 minutes.


I have to admit it was a bit of a job getting these out of the pan (as you can see!) and it probably would have been easier to make a large treacle tart and cut it into slices, but I wanted these to be bite sized. They are best served warm, maybe with some cream - though they are very sweet, so you won't want too many!


I'm sending this to Dead Easy Desserts, a blog challenge hosted by Maison Cupcake, for desserts that take 30 minutes or less to make.


I'm also sending this to Cakeyboi's Treat Petite, as the theme is baking small treats for loved ones, and my boyfriend loved these!


Monday, February 10, 2014

Meal Planning 2014 - Week 7


Monday

Breakfast yogurt

Lunch Buy lunch out

Dinner Out with my boyfriend


Tuesday

Breakfast cereal


Lunch Slimming World pasta quiche


Dinner Wine-glazed duck breasts with figs (chicken instead of duck for the other half) from this recipe


Wednesday

Breakfast cereal


Lunch leftover Slimming World pasta quiche


Dinner coconut-shrimp with mango dipping sauce from this recipe with chips; cajun spiced chicken for my boyfriend as he doesn't eat shrimp


Thursday

Breakfast cereal


Lunch macaroni cheese on toast (I know this is technically pasta twice in the same day but it's completely different... and I need a quick lunch after a driving lesson)


Dinner goat's cheese and bacon ravioli with meatballs based on this recipe


Friday

Breakfast cereal


Lunch jacket potato


Dinner Valentine's Day- we're staying in and I'm cooking steak and chips followed by chocolate fondant


Saturday

Breakfast yogurt


Lunch zuppa toscana soup for me from this recipe, tomato soup for him with bread - zatar twists


Dinner Out for a friend's birthday


Sunday

Breakfast cereal


Lunch Fry-up for the other half, sausage gravy for me

Dinner Duck with plums and star anise from this recipe for me, chicken for the other half


Sunday, February 9, 2014

Restaurant Review- Bar Remo, Princes Street, London


Restaurant name: Bar Remo

Location: Princes Street, London

Description: Low-key Italian restaurant in the heart of London near Oxford Circus; according to the website, it has been run by the same family for over 90 years.

Reason for visit: Dinner before a show at the nearby London Palladium - Ros from The More Than Occasional Baker and I went to see Rick Stein Live.


I ate: Lasagne al forno, £8.45, followed by tiramisu, £4

My companion ate: I can't remember the exact name but I think it was papardelle with mushrooms in a tomato sauce, followed by the same dessert.


The food was: Simple but very tasty with very large portions. The tiramisu tasted properly home made and the lasagne was piping hot and very filling.

The atmosphere/service was: It's a small restaurant with relatively basic seating but comfortable enough and it has a very down-to-earth, unpretentious atmosphere.


Price range/value for money: Very good, the portions were very large and reasonably priced - I would have expected to pay more.

Would I recommend it? Yes, it's near Oxford Circus but a little bit away from the main bustle of the shopping streets so it would be a great place to stop for lunch while you are shopping, or for a pre-theatre dinner.

Friday, February 7, 2014

Rosewater Mini Rose Bundt Cakes


These rosewater cakes were made in a mini bundt tin but you could also make them as cupcakes with rosewater buttercream frosting. The cakes have a surprise on the inside - they are bright pink! I made them for a colleague's birthday as I knew she wouldn't want a big cake and a lot of fuss but I wanted to make something. I received the Nordicware mini rose bundt tin for Christmas and wanted to try it out as well!


I thought rosewater would be the perfect flavour to go with the rose cake tin. When I want to find a recipe using a specific ingredient I am more likely to turn to the internet than a recipe book- books are great for browsing but it can take a long time to find a specific recipe if you don't know where to look! I found this recipe on the Australian website Taste.com.au but did not include the frosting, and I used vegetable oil instead of canola oil.


You need:

1 cup vegetable oil (250ml)

1 and 1/2 cups caster sugar (330g)

2 eggs

1 cup plain yogurt (280g)

2 cups self-raising flour (300g)

2 tbsp rosewater

pink food colouring


Preheat the oven to 180C. Mix the oil, sugar and eggs in a large bowl.


Gently mix in the yogurt then the flour.


I then added the pink food colouring.


Here's a close-up of the Nordicware bundt tin I got for Christmas, it's very pretty!


And here you can see the side view


I sprayed each indent in the tin with Dr. Oetker Cake Release:


Bake in the oven for 20-25 minutes. The cakes came out of the tin perfectly thanks to the Cake Release, and you can clearly see the rose shape - I was really pleased with these.


I had enough mixture for a second batch but had run out of Cake Release so instead I used Fry-Light. I thought a spray oil would work better than greasing the tin with butter as it would get in all the nooks and crannies. I also thought that using Fry-Light would probably be no different to Cake Release, but I was very wrong! Fry-Light is obviously an oil for cooking and you can see from the picture below how dark the cakes using Fry-Light came out. They still came out of the tin easily, but they cooked for the same length of time - of course, the oven would have been hotter for the second batch, but I think using oil instead of Cake Release meant they were overdone. I'll go back to using Cake Release in future!


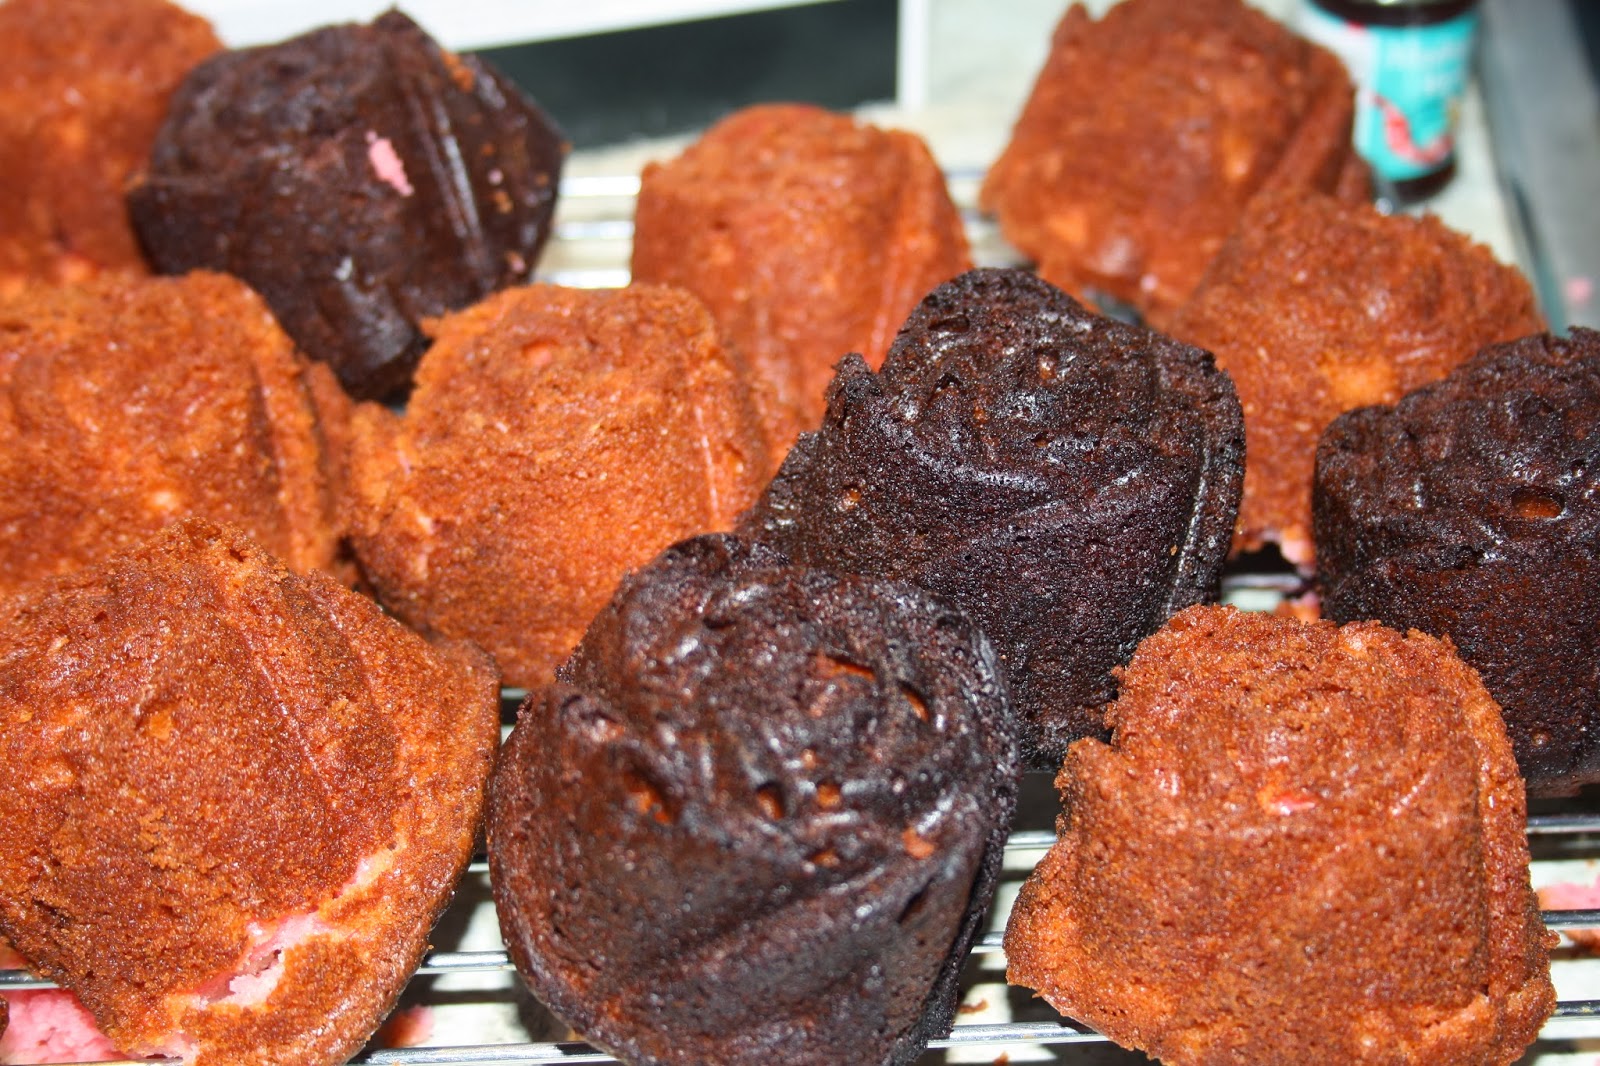
Despite everyone thinking the darker cakes were chocolate, they went down well at work. I sprinkled the tops with edible red glitter for a little extra pizazz. Unfortunately I forgot to take a photo of the inside as they were bright pink from the food colouring! The rosewater taste was quite subtle but I think definitely there, and the shape of the cakes was a real talking point.


There are several blog challenges this month that this recipe is perfect for. Firstly, Calendar Cakes, hosted by Rachel at Dollybakes and Laura at Laura Loves Cakes, as their theme is l'amour. (That's love, for non-French speakers!)


Secondly, I'm sharing this with Cakeyboi for Treat Petite, as the theme is Valentine's treats for your loved ones.


Four Seasons Food is focusing on "food from the heart" this month so I think these mini rose cakes fit nicely with the theme. The challenge is hosted by Anneli at Delicieux and Louisa at Eat Your Veg.


fsf-winter


Finally a new challenge, Love Cake, hosted by Jibber Jabber. Rose-shaped cakes are certainly evocative of love and passion - the theme this month is baking with passion.


Wednesday, February 5, 2014

Restaurant Review - Bill's, Salisbury

Restaurant name: Bill's

Location: Salisbury, Wiltshire

Description: Bill's started out in Lewes; the owner ran a fruit and veg stall which was destroyed by flooding in 2000 and he wanted to offer locals somewhere to sit down and eat, so the restaurant was born. It's now a small chain; I've already been to the one in Wimbledon.

Reason for visit: I met up with my old school friends over Christmas - we grew up in Salisbury and were all visiting our families there over the holiday period. When we were teenagers (18, of course!!) we used to go to a pub called the Chough; it remained under the same name (though I think different ownership) for many years but had just changed into Bill's restaurant. The layout inside was much the same and it was nice to be somewhere familiar, but at the same time good to try out a new restaurant. An additional reason for our visit was that the local paper was running a promotion for a free bottle of wine when two people ordered a main meal so it seemed like a bargain.


I ate: Rump steak with fries and garlic butter, £13.95. I didn't order a dessert but did try some of my friend's warm cinnamon mini doughnuts served with chocolate dipping sauce (£5.50).

My companions ate: There were 7 of us so we tried several dishes on the menu including the duck pie, bbq pork ribs, and the fish pie. One friend who is vegan had a selection of side dishes brought together as one meal.

The food was: Very good - my steak was very nicely cooked and my friends were all impressed with the food as far as I was aware. The mini doughnuts were especially good!

The atmosphere/service was: Good - we had a few dietary requirements for the chef to take account of and the staff were very helpful. We also decided to be cheeky and ask if we could use more than one voucher for a free bottle of wine as there were 7 of us dining, and they said yes!

Price range/value for money: It's been a while since I ate out in Salisbury and I'm used to London prices, but this seemed quite reasonable for what we had.

Would I recommend it? Yes, I liked the food and the staff were friendly and helpful. Perhaps it's because the Chough was one of my favourite haunts but I think this place will do well in Salisbury with locals and tourists alike.

Sunday, February 2, 2014

Baked Beef Cannelloni and the KitchenAid mincer


There's no denying that KitchenAid mixers are expensive, and take up a lot of space in the kitchen, but I absolutely adore mine. It's baby pink and was a present from my boyfriend :-) One reason I love it is how versatile it is - you can get all sorts of attachments for it. I've already got the pasta attachment and for Christmas my boyfriend's dad gave me the mincer attachment. It's very easy to use - you just screw it on to the end of the KitchenAid and it's ready to go.


I usually shop in supermarkets for the convenience but I get to our local butcher when I can - a great place called Scott's. They have a catering service which my boyfriend's family uses for parties, particularly on Boxing Day, and they also have a deli and meat counter. I asked for some steak that was suitable to mince, and was given some chuck steak. I'm not sure how much it was by weight; I asked for enough to make a couple of burgers for two people and ended up making three burgers and a portion of beef cannelloni out of it.


Here's the mincer attachment on my KitchenAid. You simply turn it on, feed the steak (sliced into strips) into the top, and watch it come out the other end as mince. Don't forget to put a bowl underneath to catch the mince!


It took literally no more than a minute or two before I had a lovely bowlful of minced beef. I decided to keep it simple and seasoned the meat with salt and pepper and oregano.


When I've made cannelloni before, I've cooked the mince first, but then found it tricky to stuff the meat into the dried pasta tubes. I decided to try stuffing the cannelloni with raw mince - I checked on the internet that this would work and I wouldn't end up with raw meat, and it seems to be a perfectly acceptable method. It was much easier to get the raw mince inside the pasta though when it cooked it had turned into pretty much a sausage!


Place the filled cannelloni tubes in a foil-lined baking tin and pour over passata which you can mix with garlic or herbs and season to taste.


Bake in a preheated oven at 180C for about 20-25 minutes.


To serve, sprinkle with parmesan cheese. This is a pretty simple but tasty recipe and was a great way to test out my new KitchenAid attachment!