Sunday, August 23, 2015

Meal Planning Monday Week 35


Monday - fish and veg for me, gammon and mashed potato for him
Tuesday - steak and chips
Wednesday - homemade chicken nuggets from The Takeaway Secret
Thursday -spaghetti Bolognese for him; bikini Bolognese from Inspiralized for me
Friday – the Other Half is at Star Wars Secret Cinema so back late. I will have a stir-fry
Saturday lunch – my parents coming to stay. Going to do a full English breakfast at lunchtime.
Dinner- chicken korma using recipe from the Takeaway Secret. Dessert: apple and pear ricotta parfaits with pistachios, from Inspiralized
Dinner – family BBQ (will need to work out the menu separately!)

Layered Chocolate Pudding and Ozeri Double-Walled Glasses Review


These double-wall glasses, as they are apparently called, are great for hot and cold drinks and also a nice way to serve desserts.
 
I was sent a set of Curva Artisan Series double wall glasses by Ozeri (£24.96 on Amazon at the moment or 33 euros on the Spanish Amazon site) to review. So as well as using it for drinks, I created a yummy layered chocolate dessert recipe (see below).


The glasses came in an attractive box that I thought would make a nice gift, and each glass was individually wrapped in bubble wrap to protect it.


The double wall keeps cold drinks insulated and free of condensation, and also means hot drinks won’t feel as hot through the glass- I made a cup of tea and after I poured in boiling water the glass still felt cool! It did heat up after I left the drink a while of course but it makes quite an elegant way to serve a fruit tea or even a coffee I think.
 
 
The glasses were surprisingly lightweight; they are made from borosilicate glass which is stronger and shatter resistant and not as heavy as glass. I really liked the way the liquid looked like it was suspended inside the glass; it creates a cool optical effect that I thought would work well for desserts.
 
I was inspired by this recipe on Mel's Kitchen Café, for a peanut butter and chocolate layered dessert but as my boyfriend doesn't like peanut butter (I know, right?!) I decided to change the flavour for butterscotch. I bought some butterscotch flavouring on Amazon as I had a couple of recipes in mind I wanted to use it for. I also decided to add an Oreo cookie at the bottom of the dessert so my recipe was quite different in the end.
 
To serve two, you need:
2 Oreos
 
For the butterscotch layer:
1/4 cup caster sugar
2.5 tsp cornfour
pinch of salt
1 cup milk (any kind apart from skimmed)
1/4 cup double cream
few drops of butterscotch flavouring or vanilla if you don't have it
 
For the chocolate layer:
3 tbsp. caster sugar
1 tbsp. cornflour
1 tbsp. cocoa powder
3/4 cup milk (any kind apart from skimmed)
1/4 cup double cream
50g plain chocolate, chopped
 
To decorate:
whipped double cream
chocolate shavings or butterscotch chips
 
First make the butterscotch or vanilla layer. Mix the sugar, cornflour and salt and mix in a little of the milk to make a paste. Stir in the rest of the milk and cream and bring to the boil whisking constantly. When the mixture has just boiled remove from the heat and add the butterscotch or vanilla flavour. Allow to cool a little.
 
Place an Oreo cookie at the bottom of each serving glass and spoon over the butterscotch pudding. Place in the fridge to chill.
 
Make the chocolate layer; mix the sugar, cornflour, cocoa powder with a little milk to make a paste. Add the rest of the milk and cream and bring to the boil whisking constantly. When the mixture has just boiled add the chocolate and stir until melted then remove from the heat. Allow to cool a little. Spoon on top of the butterscotch layer and chill in the fridge until completely cooled.
 
To serve, spoon some whipped cream on top and add some butterscotch chips or chocolate shavings.
 
 
I'm sending this to We Should Cocoa, hosted by Choclette at Tin and Thyme, as this month she is accepting any chocolate recipes.


Saturday, August 22, 2015

Belgian Chocolate Wedding Cake


There’s a reason why wedding cakes cost hundreds of pounds – the ingredients alone for a cake of that size are pretty expensive, and they are a LOT of work. I took a wedding cake decorating class at the beginning of 2015, and we only completed two cakes over the 8 weeks. But I discovered I was fairly good at it, and wondered if I would ever get the chance to make a wedding cake for real….
   
 
For those of you who know Ros from The More Than Occasional Baker I’m thrilled and a little bit scared to announce that she has asked me to make her wedding cake! She is a good friend so I think it’s just wonderful to ask someone you know to make your cake, though it is a little bit daunting as I will be watching it all the way through the wedding hoping it doesn’t collapse! Also, making a cake for someone who is such a good baker herself is a bit of a challenge… so of course I wasn’t going to do it without a practice run!
 
I’m not going to show you the whole cake or even how it’s going to be decorated but I did want to share the recipe. I found it online on the BBC Good Food website and was pleased to find it was for a 30cm (12 inch) cake, which is what I’m baking as the bottom layer, so I wouldn’t have to scale up ingredients or adjust cooking times.
 
I followed the instructions to the letter, other than not noticing that I needed two pots of sour cream so I only bought one, and didn’t have time to go back to the shop. It turned out perfectly like this though, so when I make the real thing I need to remember to only use one pot of sour cream then as well.


It took a good half an hour to make the mixture then the cake took just under the suggested 2.5 hours in the oven; the way to bake a cake this large without it being burnt at the edges or raw in the middle is at a low heat. The cake was flat on top which was great, and it came out of the tin easily – I had to buy a new cake tin as I didn’t have one big enough and only realised at the last minute that it didn’t have a loose bottom like my other cake tins. I sprayed it liberally with PME Cake Release and had no problems.
 
 
This page on the BBC Good Food site was also helpful, as it advises how to assemble the wedding cake and gives recipes for the buttercream. I decided not to fill the cake – when wedding cakes are sliced, they are done in a specific way which means you get a thin rectangular slice (rather than a triangle) and I don’t think I’ve ever had one that has filling in the middle. As the pieces aren’t large when they are served, the buttercream around the side and on the top, and the white fondant, is usually enough. Also, I was quite worried about the structural integrity of the cake if I split and filled it; I knew it would be harder to cover in fondant and get smooth sides if the cake had been cut through, and there was a chance the buttercream would squash down and the top part of the cake would move. Luckily the chocolate cake was so moist and light that it really didn’t need a filling at all.
 
 
So I followed the recipe given for the chocolate buttercream and had about four times as much as I needed! I spread it on the top and around the sides of the cake and covered it with roll-out fondant – which was not easy with a 12 inch cake! It looked OK for a practice cake but I think I will need to have a lot of spare fondant when I come to do the real thing in case I need to take it off and start over!
 
So this is all you are getting as a teaser of the real wedding cake, which I will post on my blog with her permission after the wedding itself in a few months time!
 
 
In the meantime because this cake uses Belgian chocolate I am sending it to Formula 1 Foods, the Grand Prix-related blog challenge I host, as the race is coming from Belgium over 21-23 August.


Thursday, August 20, 2015

Courgetti (Zucchini Noodles) with Tomato and Red Pepper Sauce

This year’s trendy kitchen gadget is the spiralizer, which turns vegetables (and fruit) into spaghetti-like strands. I’ve already used it to make these sweet potato waffles which were much tastier than I expected, and really healthy. I hadn’t successfully made ‘spaghetti’ out of it yet – I did spiralize a carrot, and bring the strands to the boil, at which point they turned to complete mush. Lesson learnt!
This time I had a courgette (zucchini) in the fridge left over from making vegetable kebabs for a barbecue and remembered that courgetti was one of the first recipes I came across for the spiralizer – courgette spaghetti. You can serve it with whatever you like; I also had some tomatoes and red pepper left in the fridge from the barbecue and found this recipe from Hemsley and Hemsley, two sisters who have a healthy eating website and recipe book.
They recommend eating the courgette raw but I didn’t really fancy that as I don’t even eat courgette at all normally, so I decided to fry it in a little butter. Be aware you don’t get a huge amount of ‘spaghetti’ from one courgette; it was enough for a small portion (it was pretty late when I got home from work that night and I didn’t want a big dinner at 9pm) but otherwise I would say this amount is more of a starter, side dish or small meal. For two people, I would do three courgettes.
I changed their recipe a bit:
To serve one, you need:
Spiralizer machine
1 large courgette, trimmed flat at each end
Half a red pepper
2 tomatoes
1 tbsp balsamic vinegar
1 tbsp of oil for the pan plus 1 tbsp for the sauce
Clove of garlic
Handful of fresh basil
Handful of cashews or peanuts (I couldn’t find cashews in the cupboard and at 9pm wasn’t going to keep looking, so used unsalted peanuts!)
NB: Ideally you need to make the sauce, or at least the red pepper and tomato part, the day (or several hours) before.
Preheat oven to 165C.
Line a baking tray with foil and spread around 1 tbsp oil. Cut the tomatoes in half and the red pepper into chunks and place face down in the pan. Roast for about an hour; I had my oven at too high a temperature so the skins on the tomatoes burnt, but they were very easy to remove. After an hour, add the garlic to the tray and roast for another half an hour.

  
Remove the charred skins from the tomatoes and pepper and squeeze the garlic out of its skin, either into a small bowl or straight into a food processor. I did this part the night before so kept the ingredients in a bowl in the fridge.
In your food processor blend the tomato, pepper, garlic, vinegar and rest of the oil, plus the basil leaves, nuts and salt and pepper.

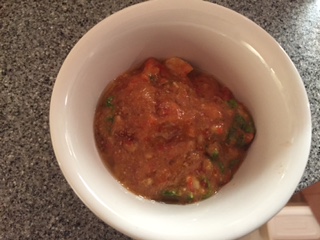
To make the courgetti, place the courgette in the spiralizer and turn the handle until you have what looks like spaghetti. You can eat this raw, according to the Hemsley and Hemsley recipe, but I preferred to warm it through in a frying pan in a little butter. Top with the tomato and red pepper sauce.

For someone who has honestly never willingly eaten courgette, I was very surprised at how nice this tasted! I think it will take a bit of getting used to- courgette that is, not spiralizing –but I would definitely class this recipe as a success.


Courgette is known in the US as zucchini but the name courgetti definitely sounds better for this dish! But since it does also begin with Z, and that is the letter I have chosen this month for Alphabakes (which I co-host with Ros of The More Than Occasional Baker) I am sending it in.


I'm also sending this to Extra Veg, hosted by Jen's Food, on behalf of Helen at Fuss Free Flavours and Michelle at Utterly Scrummy.

Wednesday, August 19, 2015

Sticky Orange Chicken Thighs


I made this for a barbecue and thought it was so good I wanted to share the recipe. I used boneless chicken thighs instead of wings and drumsticks, and cooked them in the oven then finished them off on the barbecue. It's a good idea to marinade the chicken overnight if you have time but it still tastes good even if you don't do that.


The original recipe is from the BBC Food website.

You need:
10 boneless chicken thighs
2 tbsp. clear honey
half a teaspoon of ground ginger
1 tsp Chinese five spice powder
2 tsp soy sauce
3 tbsp. orange marmalade
grated orange zest from 1 orange (optional - I actually left this out as I didn't remember to buy a fresh orange)
I tbsp. olive oil

Mix all the ingredients apart from the chicken, and toss the chicken in the marinade to coat. Leave overnight if time.


Line an oven tin with foil and cook at 180C for about 20 mins, depending on the size of your chicken pieces (mine were quite small).


Finish off on the barbecue.

Keep Me Going: Cereal Review


I’m more of an occasional cereal eater and for breakfast usually have a yogurt or occasionally eggs, with cereal reserved for the times when I want something more substantial than a yogurt but don’t have time for a cooked breakfast. I have to admit a weakness for sugary cereals which probably stems back to my childhood when Frosties were the only ones I would eat! Now, I alternate between something healthy like Special K, a nutty muesli from Jordan’s or Dorset Cereals, and the occasional treat of something like Krave!
 
I was recently sent some cereal called Keep Me Going. Richard Paterson from Freedom Cereals, the independent company behind the product, said it was developed "after noticing just how much sugar and salt were in the cereals my 3 children, in particular, were eating. The idea was to develop healthy nutritional products with functional benefits too (like low Gi) but which could be as competitively priced as the brands from Kelloggs and Nestle (Cereal Partners). This turned out to be quite challenging and it took over 2 years to get right!" 

 
So far they only have one product but are planning to expand the range soon.
 
The cereal consists of whole grain barley and oat pillows and I have to admit looks a bit like the kibbles I give my cat! It’s very healthy as it’s low in sugar, salt and fat and is high fibre and low GI. The GI testing was conducted by Hammersmith Hospital and involved around a dozen volunteers having their blood-sugar levels checked at regular intervals after eating the cereal over a two week period.
 
It took a little getting used to at first as I am used to much sweeter cereals, and I would prefer a little more flavour such as a sprinkling of cinnamon. But a healthy start is so important and it’s easy to find a way to tailor this cereal to suit you, whether that’s adding fruit or honey or a thicker soya milk – I really enjoyed it topped with low fat lemon yogurt.
 

The packaging of the cereal box tends to be quite important for children and the vibrant green colour, the image on the box and the red logo – in a writing that reminds me a little of Kellogg’s but clearly is different – would appeal. Most importantly you get a free pack of geographical trading cards in the box – so this isn’t some po-faced healthy brand that doesn’t want to have fun. You can print a world map from their website to go with the trading cards as well.


There's also a hidden code on the top flap which, if cracked, takes you to an off-menu page on their website with lots more information on codes and ciphers and another code to crack which leads to a further page; also, if you take the pack to pieces, you'll find a couple of words of 'Pig Latin' on one of the flaps. I completely missed all of that as my breakfast tends to be very much grab and go but I think it would be a lot of fun (and quite educational) for children!

I started off with the code thinking it was pretty easy but the last part is different and it took me a few minutes to figure out - but I got there in the end!

Keep Me Going is only available at Ocado at the moment; if you haven't shopped there before you can get a money off code here (or if this has expired, keep an eye out as they come up quite often). The company's second product, Keep Me Strong, which is high in protein and low in salt and sugar, will be on its way soon. It would be good to see more independent companies represented in the cereal aisle of the supermarket so I hope this brand does well.

Thanks to Freedom Foods for sending the cereal. All opinions are my own and I was not asked to write a positive review. Etc etc.                     

Tuesday, August 18, 2015

Meat-Free Barbecue with Quorn

Did you know that only 25 percent of the people who buy Quorn are vegetarians? The rest, like me, buy it for health and diet-related reasons. Quorn is low in fat and calories and is a very healthy source of protein.
 

I often have Quorn sausages in a sausage sandwich while my boyfriend has the full-fat kind, but when it comes to barbecues, I never go meat free. Quorn just isn't a patch on a juicy burger - or so I thought until the brand invited me to an event at the London Barbecue School.


First a few words about the London Barbecue School. I was amazed I'd never heard of it before but then owner/head chef Alastair said it had only been going for a couple of months. They have an outdoor space in a courtyard just across the road from Peckham Rye train station (easily reachable from London Bridge in less than ten minutes), round the corner from the Rooftop Cinema I've heard so much about.

The London Barbecue School uses a ceramic barbecue called a Kamado Joe – I’d never heard of these before. They have interchangeable cooking surfaces which let you create different heat zones; you cook with the lid closed and control the oxygen going to the fire using a vent at the top and the bottom.
 
 
We divided ourselves into four small groups and each had a cooking station with the barbecue, a selection of ingredients and a recipe. My group used the Quorn breaded chicken burgers to make wraps – chop some courgette, peppers and red onion and grill it, then spread a tortilla wrap with Greek yogurt mixed with lemon zest. Add some rocket, slice up the chicken burger and add to the wrap, roll up and enjoy. You can find the recipe on the Quorn website here.


It was very easy to make and assemble. We mixed lemon zest into Greek yogurt and spread that on a tortilla, and added the barbecued vegetables, and the chicken burger which we sliced up. It was delicious and something a bit different!


Another group was cooking Quorn’s meat-free Swedish style meatballs, in a sauce made of red pesto, tomato puree and garlic. These were threaded onto a skewer along with some courgette, red onion and cherry tomatoes, and barbecued. The recipe is here.
  
 
There were other kebabs on offer: when I’ve cooked Quorn sausages before it hasn’t occurred to me to do anything to them, but I will from now on! Another group was slicing the sausages into chunks, coating them in a mixture of mango chutney and mustard, and threading these onto skewers – they were delicious!


Finally you can’t have a barbecue without a burger; the last group was grilling Quorn’s meat free burgers and serving them in ciabattas, which they also lightly grilled, with sliced red chilli and pea shoots.


It was a very enjoyable evening and great to meet a few other bloggers who I follow like Becca from Amuse Your Bouche and Becky Thorn, author of one of the books I have at home, the No Waste Meal Planner. It was interesting hearing some things I didn’t know about Quorn, such as that they are launching a vegan range earlier this year, and that the brands is celebrating its 30th anniversary, and is present in so many countries around the world. It was great fun learning some new ideas for things I can do with Quorn so I will be trying some of these out at home!
 
Thanks to Quorn for inviting me to the event.

Monday, August 17, 2015

Meal Planning Monday Week 34


Monday: fish and veg for me, gammon and mashed potato for him
Tuesday
Dinner- was supposed to be out but it just got cancelled; now working from home so I will get creative with whatever is in the freezer
Wednesday
Lunch – team lunch at Wahaca
Dinner – sausage and tomato casserole
Thursday: curry - had on the meal plan last week but didn't make it
Friday - chicken pie and mashed potato
Saturday
Lunch – at a car show where my boyfriend is taking part in the Sportingbears “Dream Rides” team, offering rides in supercars to paying customers for charity. He did this at Leeds Castle last year and it was brilliant – though it means I will have to occupy myself all day!
Dinner – something quick as I don’t know what time we will get back
Sunday
Lunch- Waterzooi chicken soup/tomato soup for him
Dinner- Slimming World nachos/potato wedges